Tuesday, August 30, 2011

Newspaper Pots!!

I'm pretty much well on the way with my seedlings for Summer but I just wanted to write a quick line about a wonderful discovery I made this year.
Whilst trawling the internet looking for anything new and exciting in the gardening world, I found a great video link for making square seedling pots from newspaper. This, in my opinion, is fab as it meets many of my criteria for a good gardening tip -
1) it recycles something I have in my home,
2) it saves me money on buying pots, and
3) it's easy
(this last one is VERY important as being a busy wife, teacher and mother I don't have time to be clever!!!)

pic from dirthappy.blogspot.com

Another great thing about these pots is that they can be planted in the ground with the seedling inside them so you don't have that whole "my plants will die when I transplant them" thing going on!
The pots will rot away into the soil and provide some form of compost for next year's crops. Clever hey? Some 'green' folk may be worried about the ink going into the soil but most newspapers nowadays use vegetable based inks and if they don't, THEY SHOULD!
Round newspaper pots have been around (excuse the pun) for ages - you know the ones, made by rolling sheets of newspaper around a glass then pulling out the glass and tucking in the bottoms - but I always found them difficult to stand up and there were always gaps between them when I put them onto trays.
These square ones though are brilliant because they're very strong and sturdy and when you stand them together all filled with soil they support each other and don't fall over!
Truly wonderful!
So, I hear you ask, how about sharing this link? Well, here it is. You can find it on
which is a great website and has tons of interesting stuff, not least, a video on how to make the pots!
So, go to it! Fetch that pile of newspapers from your garage and get folding!!!

Get the rest of the household involved and maybe have a competition to see who can make the most pots in front of the TV tonight - but they MUST be made properly ... no slapdash pots please!
Let me know who wins..................

Sunday, August 28, 2011

The Garden Shed

To me, a native of the UK, no garden is complete without a garden shed. Whether it be a fancy outdoor room or a basic structure with four walls, a roof and a door, the garden shed is to the gardener what a computer is to the geek. Essential.

So what, exactly is a garden shed for? Well, to some people it's a hideaway, a place to  shut out the rest of the World and just chill out. To others it's a practical place where seedlings are transplanted, cuttings are taken and gardens are planned. To even more it's just a storeroom, a place to keep bags of fertilizers, potting soils and tools.

My grandfather’s shed was at the bottom of the garden and was like a secret hideaway to my brother and I. It always smelt of wood shavings and peat which even today are smells that can launch me back forty odd years to that small town garden in London. There were old tools, a deckchair, a workbench and a radio. Four crucial elements of any respectable garden shed.
  
But what more could it be? Instead of looking out of your window onto this
(picture from paddyavc.hubpages.com)


with a bit of elbow grease and imagination, you could look out onto this

(picture from apartmenttherapy.com)

I know which one I would prefer.

A  shed doesn’t even have to look like a shed. I love the idea of this one as a home for a hobbit or a gnome!

(picture from ehow.com)

Or how about this? Remember Dr Who and his tardis? 

(pic from wired.com)

Let your imagination run wild! You could have a castle, a gingerbread house or even your own little chapel...

(pic from 4.bp.blogspot.com)

It doesn’t even have to be made of wood. If you’re into the industrial look, how about this?

(picture from lavoroseteel.co.za)

And for those of you who like something different and a little modern, this will certainly give you an “aaaahhh” moment..... 

(picture from trendir.com)

So what can you do to transform your shed? The most obvious is to give it a lick of paint. Choose brown, green or blue to make it blend it with nature or go completely the other way and make it a focal point by painting it a vivid bright colour. The sky’s the limit!

Next, take a look at the inside. Get organised with hooks and shelves. Give each item a dedicated place so you know instinctively when your other half (or your kids) has removed something and not replaced it! (Many a time has my trowel ended up in the sandpit!) Get as much off the floor as you can. That way it’s easier to sweep out and keep tidy. You’ve then got room to put in a comfy chair for those moments of gardening bliss on cloudy days when it's just too chilly to sit outside.

Even the dullest shed can be transformed. An eyesore can become a thing of beauty…..

(pic from highstreetmarket.blogspot.com)

No matter what you choose, nor how it looks, there is no doubt that every garden needs a shed. For storage, for keeping bags of compost away from the dog or simply for sitting in and enjoying a well earned cuppa as the rain pours down outside!

Every man’s home may be his castle but every man’s shed is his little piece of paradise!!!

Friday, August 19, 2011

Putting the BOOT in!!!

I know this is a little off the topic of growing veg but I couldn't resist a post about gum boots!!! I'm no fashion guru but for some unknown reason I have a passion for these totally unfeminine and yet massively practical footwear!

I can remember growing up when gum boots came in two colours - black or black! Then came blue (I guess to fit in with British school uniforms) and then I began to notice that rather lovely British racing green creeping through the boot department of our local garden centre in Sussex.

Little did I know that a gum boot revolution was on it's way! (Here I can imagine gum boots the World over rising up in damp sheds everywhere and shouting, 'We demand to be noticed!")

And noticed they were.....

No longer happy to remain in the back of cupboards, trapped upside down on boot holders or slung mercilessly into the boots (excuse the pun) of cars, these boots came kicking and screaming into our lives and changed our thinking on rubber footwear forever.....

You can tell so much about a gardener simply by their gum boots. Living in South Africa and being a lover of our native wildlife, these are currently a favourite of mine ....


But for the 'horsey' set among you - what about these?


And if you're just looking for a pair to brighten your day (with perhaps a hint of 70s psychedelic madness), then these are just up your street!


But whatever you choose to wear, be it plain or patterned, there is nothing like a good pair of wellies when your're gardening!

As Nancy Sinatra put it, 'these boots are made for walking...' but what she didn't mention was that they're also good for stomping through endless heaps of sloppy mud whilst trying to double dig your veg patch!!!

Happy stompin'!
p.s. Send me pics of your favourite gum boots - if you're a real gardener you'll definitely have more than one pair!

Wednesday, August 17, 2011

How to Germinate Seeds the Paper Towel Way!!!

How many times have you bought a packet of seeds, spent an hour or so enthusiastically planting them in little pots, tended them lovingly for a couple of weeks only to be rewarded by 3 or 4 weak looking plants that die the minute they're transplanted??? Sound familiar? I know the scenario well and was put off gardening time and time again by the disappointment of seeds that either didn't germinate or that didn't survive transplanting.
NOT ANY MORE!
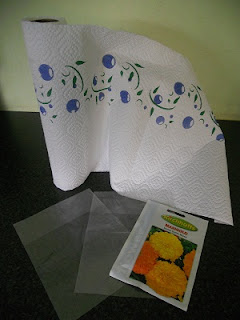
I recently discovered the cunning but very easy way of germinating almost every seed you sow without a pot or soil in sight! How is this possible, I hear you ask.... Well, all you need is a roll of kitchen towel, a spray bottle of water, some seeds and a few small plastic bags (I use sandwich bags).


Once you've gathered everything you need you can begin. First, tear off 3 or 4 squares of paper towel and put them in a pile so you have one square of 3 or 4 layers thick. Using the spray bottle, spray the towel so that the whole pile becomes damp but not sopping wet. The towel mustn't disintegrate when you pick it up but it should feel well and truly damp.
Now comes the exciting part ...drum roll please ....
OPEN YOUR SEED PACKET
(We gardeners are SO easily pleased!)
Sprinkle a few seeds into your hand and scatter them across the damp surface of the paper towel.
Try and spread them out as evenly as you can and try to ensure that they don't touch each other -
This will make sense later on, believe me!
If your seeds require light to germinate (not many do but check first) then leave the towel lying flat open. However, if they need dark then carefully fold the paper towel lengthways to make a folded strip with all the seeds on the inside.
Make sure they are all covered well.
Now write the type of seed on one of the plastic bags in permanent ink and slide the folded towel into the bag.
Fold the top of the bag over and put it in a warm dark place.
I usually gather all the bags together with different seeds inside and put them all in a shoe box which I then put in my cupboard. You can get alot of little bags in one shoe box,
BUT MAKE SURE YOU LABEL EACH BAG CORRECTLY
otherwise you'll end with coriander instead of carrots or pumpkin instead of peas!!!

And that's it! Easy peasy lemon squeezy (as my kids would say).
Give your seeds a day or two before you check them.
Depending on the type, they probably won't begin to germinate for 5-10 days but you need to ensure that the towel remains damp and doesn't dry out. If it feels dry, then just spritz it with your spray bottle.
Try it and let me know how you get on !!!!!

Monday, August 15, 2011

Up, Up and Away!!!

Yay! My seeds so cunningly sown on damp kitchen towel about two weeks ago have germinated. Not sure which ones these are but think they're Swiss Chard and Leeks. I wanted to start potting them up today but it started snowing this morning so I think I'll wait ......

Thursday, August 4, 2011

Marigold Magic!

This evening I'll be adding to my collection of germinating seeds in paper towels by sowing some marigolds the same way. It's very early to be sowing flower seeds (as Winter is still well and truly with us - we had snow last week!) but I'm ever the eternal optimist and maybe if I start sowing now, Spring will come early! I really want lots of marigolds this Summer so that I can companion plant them thru my veg to keep away the nasty bugs! And besides, they look gorgeous!

Wednesday, August 3, 2011

How do my seedlings grow?

It's that time of the year again when I start to think about the end of Winter .... please be quick ..... and what veg I'm going to attempt this year.

This year I've decided to attempt to germinate my seeds using dampened kitchen towel as a medium. From what I can gather from other veg growers, this is a fail-proof method of germinating more seedlings than sowing directly in the ground or using pots. Needless to say, I will probably be the first person to fail at this!!! Let the games begin!